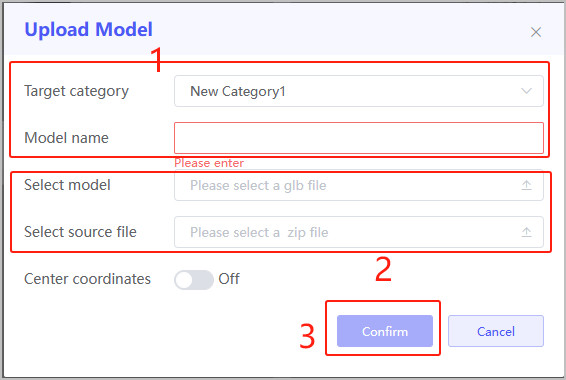
Adding Model
- Select APP Management > 3D Designer > Model Repository, and then click Add Model.
- Select Target category and enter the model name.
- Upload a glb file in Select model and the source zip file in Select source file.
- (optional) Click Center coordinates to place the model at the origin.
- Click Confirm.
Designing the Model
- Click
 to edit this model.
 - Select a structure of the model under Model structure to edit model Name.
- Click Add next to Animation to add animation to the specific structure.For details, see Adding Model Animation.
- Click Edit next to Material to change the structure material.
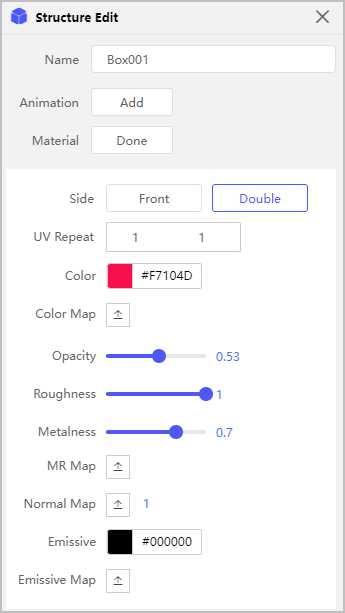
- Select Front or Double next to Side for rendering side.
- Front: The set effect will only be displayed on the outside of the model structure.
- Double: The set effect will be displayed on both the outside and the inside of the model structure.
Set the UV Repeat of the Color Map you uploaded, and set the color of the model structure you selected.
Adjust the Opacity of the selected model structure.
Upload MR Map, and adjust its Roughness and Metalness to achieve a metal-like effect.
Upload Normal Map to simulate the curves and ridges of the model structure surface.
Upload Emissive Map and set Emissive color to simulate an emissive light effect.
Adding Model Animation
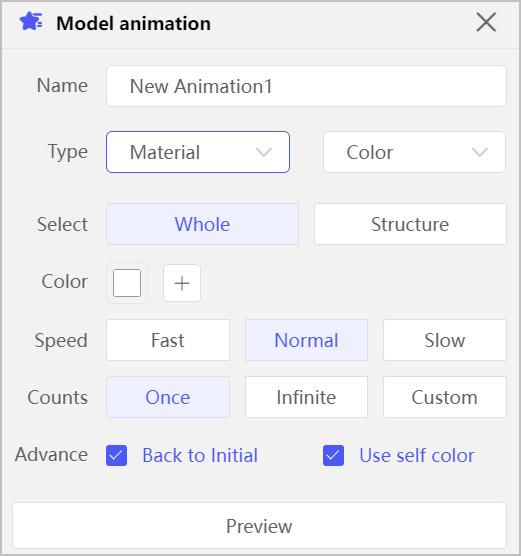
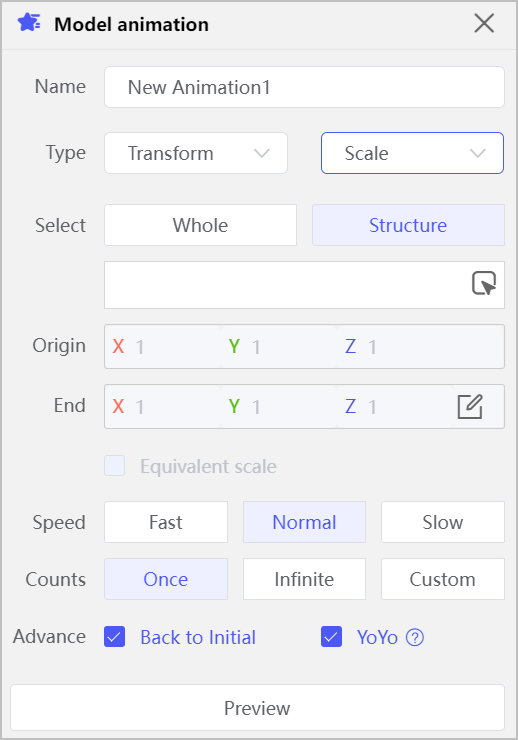
Click  next to Model animation to add animations to the model.
| Block | Parameter | Description |
|---|---|---|
| Type | Model animation | Animation configured with the model during model construction on third-party applications. |
| Material | Change the material of the model or selected structure when the animation is triggered. | |
| Transform | Change the position, angle and size of the model or selected structure when the animation is triggered. | |
| Outline | Outline the model or selected structure when the animation is triggered. | |
| Combinations | Displays the effect of selected 2 or more animations in order or simutaneously on the model or selected structure. | |
| Select | Whole | Add the animation effect to the whole model. |
| Structure | Add animation effect to the selected part of the model.
|
 , select one or more parts.
Material
- Set the Type to Material, and then slect Color.
- Select the application part of the animation next to Select, and then select the color.what you can also do
Select Opacity, and drag the progress bar to adjust the opacity of the model.
- Set the display speed and times of the animation.
- Set whether to allow initial color and original color of the model to show during animation next to Advance.
- Click Preview.

Transform
- Set the Type to Transform, and then set the transform type to Scale.
- Translate: Change model position.
- Rotate: Rotate the model.
- Scale: Change model size.
- Select the application part of the animation next to Select.
- Click
 to set the original and end size of the model, and then click the icon again to finish.info
Select Equivalent scale, and the size changes in the same ratio.
- Set the display speed and times of the animation.
- Set whether to allow initial status and yoyo effect of the model to show during animation next to Advance.
- Click Preview.
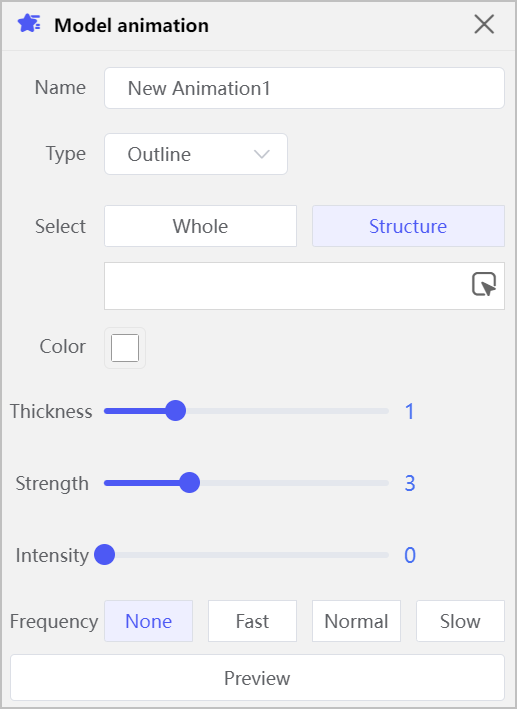
Outline
- Set the Type to Outline, and then select the application part of the animation next to Select.
- Select the color of the outline, and the thickness, strength and intensity of the line.
- Set the display frequency of the animation.
- Click Preview.
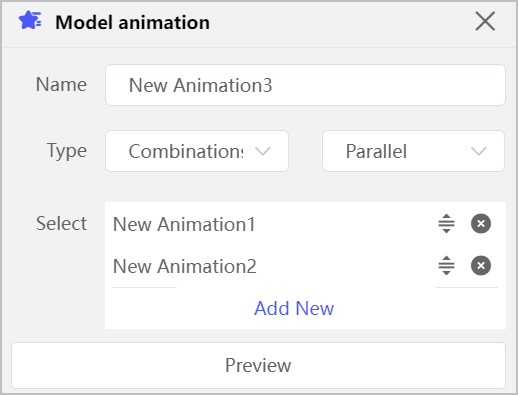
Combinations
- Set the Type to Combinations, and then set the display order of the selected animations.
- Parallel: Play the added animations simultaneously.
- Serial: Play the added animations one by one.
- Click Add New next to Select to select added animations for the combination.
- Click Preview.
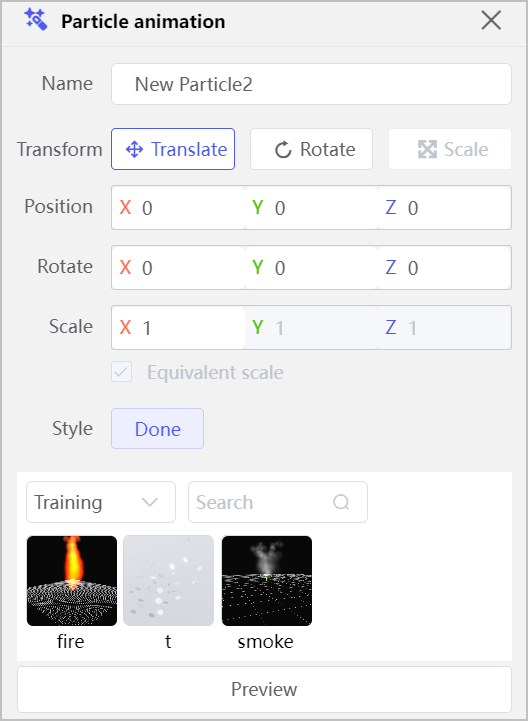
Adding Particle Animation
- Click
 next to Particle animation to add a particle to the current model.
 - Select transform type and edit the corresponding values by dragging on the canvas.
- Translate: Change the particle position, and the value will be displayed next to Position.
- Rotate: Change the particle direction, and the value will be displayed next to Rotate.
- Scale: Change the particle size, and the value will be displayed next to Scale.
- Click Select next to Style to select a particle you added to the platform.
- Click Preview.
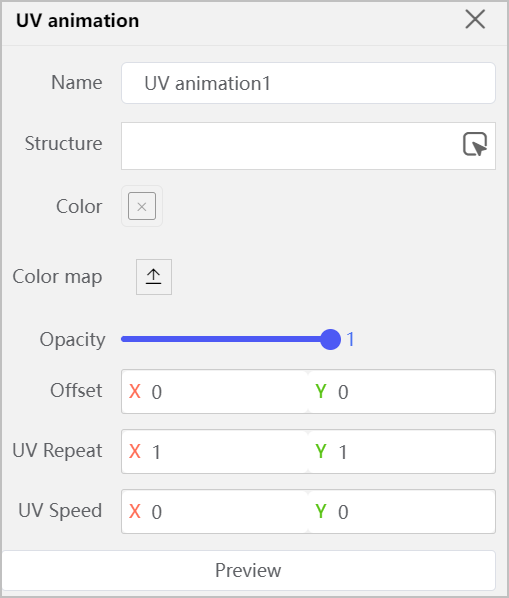
Adding UV Animation
- Click
 next to UV animation to overlap images to the model surface.
 - Select parts of the model, and select a color for the selected parts.
- Upload an image next to Color map, and set values of Offset, UV Repeat, and UV Speed.
- Click Preview.
note
Remember to enable Autosave or click Save to save the current configuration.